In this (hopefully) last pass at making my own Pebble watchface, I added better colour and the abilitity to configure the colours.
This post is the fifth in a series, for background, check out part one, part two, part three, and part four of the series.
At the end of part four, I had a font-based approach that I wasn’t happy with:
The text was too small and the watch was not as readable. I decided to go back to working with images.
Palette Swapping and Smarter Inverting
Initially, I thought I would read the individual pixels of the image as a mask, and use that to decide which colour to disply. Then I read a bit more about the commands to get and set an image’s palette. This sounded a lot more reasonable than managing image offsets and the like.
So, I reworked my images. They were originally colour text on a clear background, with antialised edges. I flattened the “black on clear” version of each digit to make it “black on white”. I then set the palette to be indexed with 2 colours. I could then use code to retrieve and manipulate the palette for each image, as shown in this code snippet:
    GBitmap *q1_bitmap = bitmaps[hour_ones_digit];
    GColor *palette = gbitmap_get_palette(q1_bitmap);
    palette[0] = foreground_colour;
    palette[1] = background_colour;

    graphics_draw_bitmap_in_rect(ctx, q1_bitmap, q1_bounds);

    GBitmap *q2_bitmap = bitmaps[minute_ones_digit];
    gbitmap_set_palette(q2_bitmap, palette, false);
    graphics_draw_bitmap_in_rect(ctx, q2_bitmap, q2_bounds);
I kept the previous layering structure, so once the text was drawn, the “second hand” could do its job, deciding which bits to flip the colour scheme for. Previously I used an algorithm to invert the colour, but now I want to allow any combination of colours, such as yellow on black. So instead of just inverting whatever’s there, I check to see whether it’s the foreground or background colour and act accordingly, as shown in this code snippet:
    if (invertPixel) {
        #if defined(PBL_COLOR)
        GColor pixel_colour = (GColor){ .argb = info.data[x]};
        GColor new_colour = gcolor_equal(pixel_colour, foreground_colour) ? background_colour : foreground_colour;

        memset(&info.data[x], new_colour.argb, 1);
        #elif defined(PBL_BW)
        // For black and white devices, the colour space is 1 bit per pixel, and white is 1.
        uint8_t byte = x / 8;
        uint8_t bit = x % 8;

        // Just twiddle the one bit.
        byte_flip_bit(&info.data[byte], bit);
        #endif
    }
For black and white devices, the logic remains the same, as I can only really toggle it between black and white.
With those changes, I was able to test various colour combinations (see below for examples). I liked the looks, but I really didn’t want to stick with a single hard-coded combination. I want to try a bunch of colours to see what fits the lighting, the time of day, et cetera.
Making It Configurable
So, the next step is to make the behaviour of the watch face configurable. The Pebble watch itself is not all that fast, and doesn’t have much memory either. The Pebble relies on a beefier device like a phone to do anything like editing configuration settings. The watch and phone app communicate over bluetooth using small message payloads.
The documentation for adding
configuration
covers two routes. The “manual”
route
is for people who want to create and host their own configuration page
somewhere. This doesn’t work offline, so it seemed less appealing. The other way
to add configuration is to use the pebble-clay
package, which allows you to bundle the
configuration page with your app, and works offline.
Their instructions suggest using the pebble binary itself to install the
package, which I tried. It dutifully installed the dependency in a
node_modules folder. I would rather be able to configure this without the
tool, as I code in my normal environment and build/test in a VM. I very much
suspect that they’re wrapping a version of npm somewhere under the hood, and at least with the version of npm I have installed, it seems like the following worked fine:
npm install --save pebble-clay
With Clay installed in the project, I then went through the rest of the Clay setup guide and created various configuration files, message keys and code snippets. The docs were good, and I found this example project useful as well in double-checking my work. That example specifically sets two colours, which was an added bonus, as I could literally copy snippets from the project.
On a side note, it’s fun to be back using structured data like a JSON
configuration file to define core functionality, it’s a very familiar paradigm
from my days working on Infusion. Here was my initial config.json file:
[
    {
        "type": "heading",
        "defaultValue": "Vertin Settings"
    },
    {
        "type": "section",
        "items": [
            {
                "type": "heading",
                "defaultValue": "Colours"
            },
            {
                "type": "color",
                "messageKey": "PrimaryColour",
                "defaultValue": "0x0000FF",
                "label": "Primary"
            },
            {
                "type": "color",
                "messageKey": "SecondaryColour",
                "defaultValue": "0xFFFFFF",
                "label": "Secondary"
            }
        ]
    }
]
Their documentation is good and they support a pretty wide range of options, including only displaying settings based on watch features, injecting your own function to customise behaviour, adding constraints and help text, really it’s pretty well thought out.
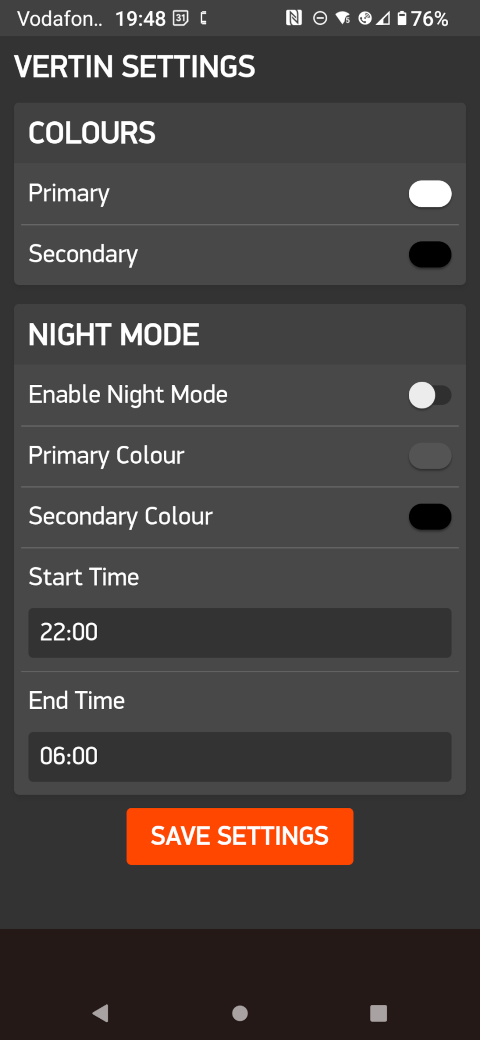
Stretch Goal: “Night Mode”
In getting the colour pickers working, I noticed that Clay supports a time picker as well. I went ahead and added a toggle for a “night time” mode, a start and end time for “night time”, and pickers for the alternate “night time” colours. This wasn’t a feature I thought I’d add for this round, but the ease of editing a little JSON and fleshing out my existing settings management just went to my head.
The only bit that was a little “extra credit” was the time input, which wasn’t covered in any examples I’d seen to date. I went on the hunt, there’s a tag on GitHub just for Pebble watch faces, and there aren’t so many that you can’t just read through a few.
Until now, I’ve glossed over most of the details of getting settings working, but I wanted to mention how I evaluated the projects, as it was a really good reminder of the key things that make settings work:
- First, I filtered down to look at the projects written in C.
- I checked the project’s
package.jsonorappinfo.jsonfile to see:- If the project is configurable (it’ll be in the
capabilitiesblock). - What message keys there are for settings.
- Whether they’re using Clay (it would be listed under the
dependenciesblock).
- If the project is configurable (it’ll be in the
- For projects using Clay, I checked their
config.json(orconfig.js) insrc/js(orsrc/pkjs). This showed me whether they were using a time picker or doing something like letting the user pick an hour as an integer from0to23. - For any project that looked promising, I checked their main C code to see how
they defined the
structfor their settings, and how they worked with the value passed from the phone app (values are packaged up for transmission into a dictionary format that supports strings, byte arrays, and integers).
Although I learned a bit from seeing a range of projects working in the same
space, I couldn’t find an example that worked with an arbitrary time of day
rather than just the hour, but thankfully, the configuration page is just HTML,
so I can also just look at how an <input type="time"/> element
works. Everything
that gets sent back will be an encoded string, in this case probably something
like 12:34 or 12:34:56 or 12:34:56.78.
The only remaining question is whether Clay does any preprocessing, or whether I can just convert single characters or substrings to integers myself. The Clay documentation provides a lot of useful info about customising your element, but there are sadly no examples or tests for this specific use case.
So, I decided to try it out and see. The added wrinkle here is you need a phone and a real Pebble to test the settings, I haven’t found a way to do this with the emulator yet. This makes debugging a bit less fun, but thankfully I’m not above using the odd print statement in the logs. I added a snippet to my settings processing:
  Tuple *night_start_t = dict_find(iter, MESSAGE_KEY_NightStart);
  if (night_start_t) {
    APP_LOG(APP_LOG_LEVEL_INFO, "Night Start Time: %s", night_start_t->value->cstring);
    APP_LOG(APP_LOG_LEVEL_INFO, "Night Start Time (int32): %u", (unsigned) (night_start_t->value->int32));
  }
(That first bit is the dictionary stuff I talked about above.) Here are the logs
displayed by starting pebble logs --phone <PHONE_IP> and then updating the
settings a couple of times:
[10:55:00] bble-vertin-c.c:366> Night Start Time: 23:00
[10:55:00] bble-vertin-c.c:367> Night Start Time (int32): 809120562
[10:55:00] pkjs> Vertin:104 Sent config data to Pebble
[10:57:40] bble-vertin-c.c:366> Night Start Time: 23:01
[10:57:40] bble-vertin-c.c:367> Night Start Time (int32): 809120562
[10:57:40] pkjs> Vertin:104 Sent config data to Pebble
[11:07:42] bble-vertin-c.c:366> Night Start Time: 09:00
[11:07:42] bble-vertin-c.c:367> Night Start Time (int32): 809122096
[11:07:42] pkjs> Vertin:104 Sent config data to Pebble
I had hoped the integer value would be something sensible like seconds, but
given that the value is the same for 23:00 and 23:01, it doesn’t seem like
anything we can use. Instead, I just converted the characters I cared about to
integers (the last setting change above let me confirm that the hour is always
two digits). Converting the characters to a number turned out to be extra extra
credit, as I had apparently forgotten everything about working with character
pointers.
After all that, I manually tested a few things, confirming that “night mode” turns on and off when it should, and that you can disable it. I was pretty satisfied with it.
The Results
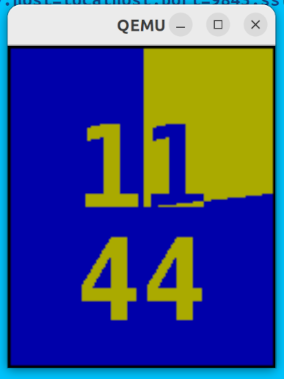
First, the watch face itself is still nice and readable, but can now display a far wider range of colours, here are a few samples:


Now let’s look at the settings. Here’s the Pebble app for Android, displaying my installed watch faces:
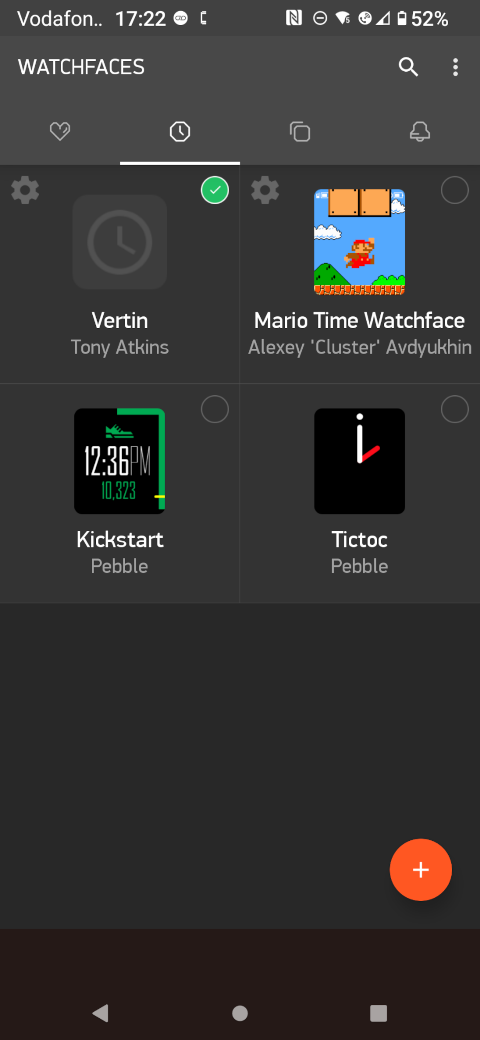
If I click the “gear” icon next to my “Vertin” watch face, I get the interface generated by Clay:
The setting I was most interested in was the colour picker, and here’s an example of its default layout and range of colours:
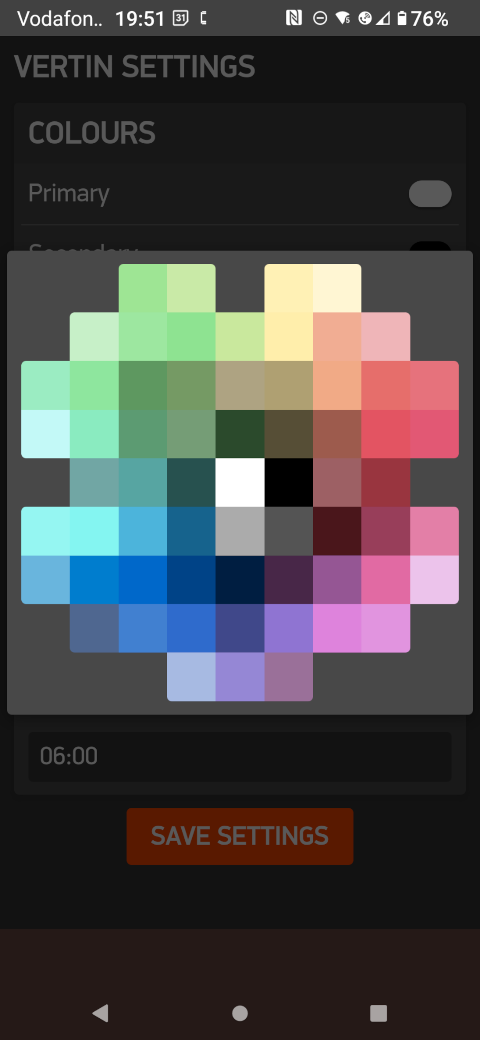
I did wonder about the somewhat muted range of colours available in the picker.
The documentation for
pebble-clay
suggests that the default palette is corrected for how it will look in sunlight.
Here are the raw colours:
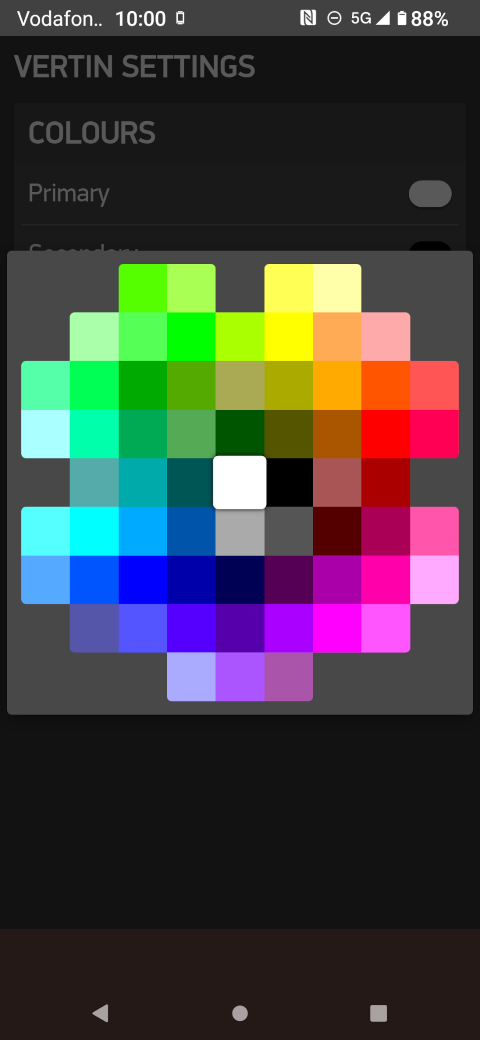
The more vibrant colours were nice and bright on the phone, but the results were just as washed out on the watch. I’d rather stick with the sunlight corrected colours, as what you see on the phone is more or less what you get on the watch.
Once you save the settings, they are persisted to the phone via bluetooth nearly instantaneously, so although it takes a few clicks to get into and change settings, you can test changes out pretty quickly.
Conclusion
In my testing to date, it seems like the watch face is most readable with white and a strong colour during the day. I’m using blue on white during the day at the moment, and trying red on black for “night time” mode, as it seems to dampen the backlight a lot when checking the time overnight. If I change my mind or you have your own watch and feel differently, everybody gets the colours they want (except for my son, who only wants to see the Mario watch face).
That’s nearly everything I had in mind when making this, at this point I may tidy things up a little, for example, polishing up the look when a “pin” appears on the lower half of the screen, or splitting the code into cleanly organised pieces.
Speaking of the code, if you’re curious, or if you do have your own Pebble and a working development environment, the code is on GitHub.
I may also just do something else for a while. Anyway, thanks for sharing the journey, and stay tuned for whatever comes next.